Instructions for Setting Up a Saltwater Aquarium
Putting together a saltwater aquarium takes careful planning and attention to detail. You may be surprised by how many components are needed to run a stable, healthy marine system. Once you’ve decided on the type of saltwater aquarium you want—whether fish-only, reef, or nano—and acquired all necessary equipment, follow these step-by-step instructions to set up your new marine tank safely and efficiently.

Prepare the Aquarium
Start by positioning your aquarium stand on a level, sturdy surface. Ensure it’s perfectly level using a bubble level, and leave ample clearance behind and beneath for electrical cords, plumbing, and equipment access. Clean the inside of the tank thoroughly with a soft cloth or sponge and fresh water—never use soap or chemicals. If desired, apply tank backing to enhance visual depth, then carefully place the empty aquarium onto the stand.
Next, organize your electrical setup:
- Sump (if used): Install the sump and associated equipment inside the cabinet or stand. It’s often easier to lower the sump in from above rather than through cabinet doors.
- Automatic top-off system: If building a DIY top-off unit, install it before placing the sump—this avoids tight working conditions later.
- Power management: Mount a heavy-duty power strip and set up a programmable light timer for future consistency.
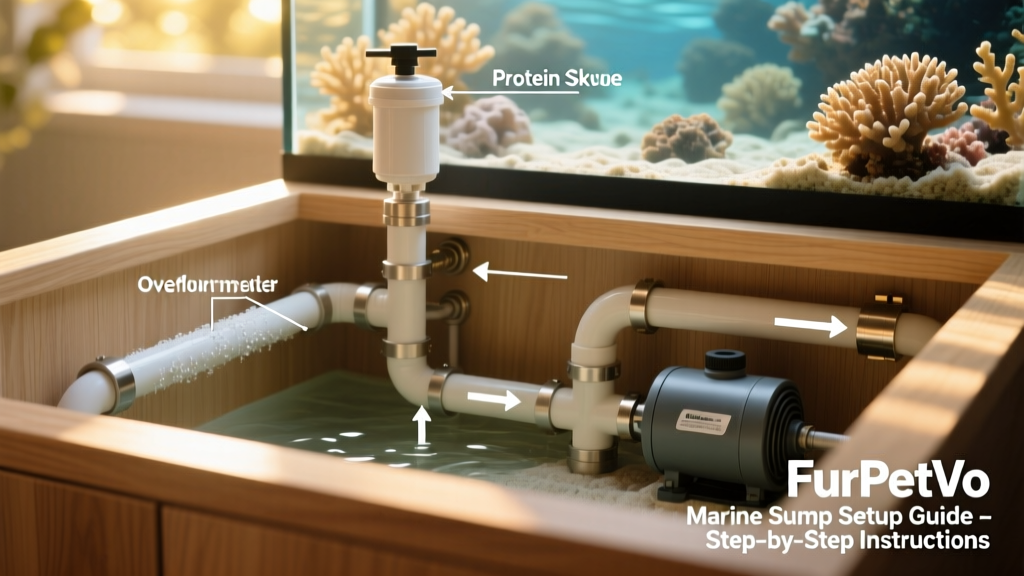
Install the Sump Equipment
If your system includes a sump, install its components now—before adding water or substrate. Following these steps in order ensures a smooth, leak-free setup:
- Assemble the wet/dry trickle filter media (or equivalent biological filtration) inside the sump.
- Connect the overflow hose from the aquarium to the sump (labeled “1” in typical diagrams).
- Mount the return pump (labeled “2”) and attach its outlet hose (labeled “4”) to send water back to the main tank.
- Install a sump-mounted protein skimmer for optimal water clarity and nutrient export.
- Place the aquarium heater inside the sump chamber—not the display tank—to maintain consistent temperature and reduce visibility.
Install the Aquarium Equipment
If you’re not using a sump, proceed directly to mounting equipment on or near the display tank. Hold off on installing lighting until after substrate and rock placement—it will only get in the way during setup.
Begin with your primary filtration:
- Rinse filter pads in fresh water and reinstall them in the filter unit before mounting it securely to the back wall of the tank.
- Verify at least 1–2 inches of clearance between the tank’s rear panel and the wall—this allows easy removal for cleaning.
Then install:
- A tank-mounted or canister filtration system
- A hang-on or in-sump protein skimmer
- Powerheads (position them roughly where they’ll ultimately sit—adjustments will follow once live rock is placed)
- The aquarium heater (if not installed in the sump)
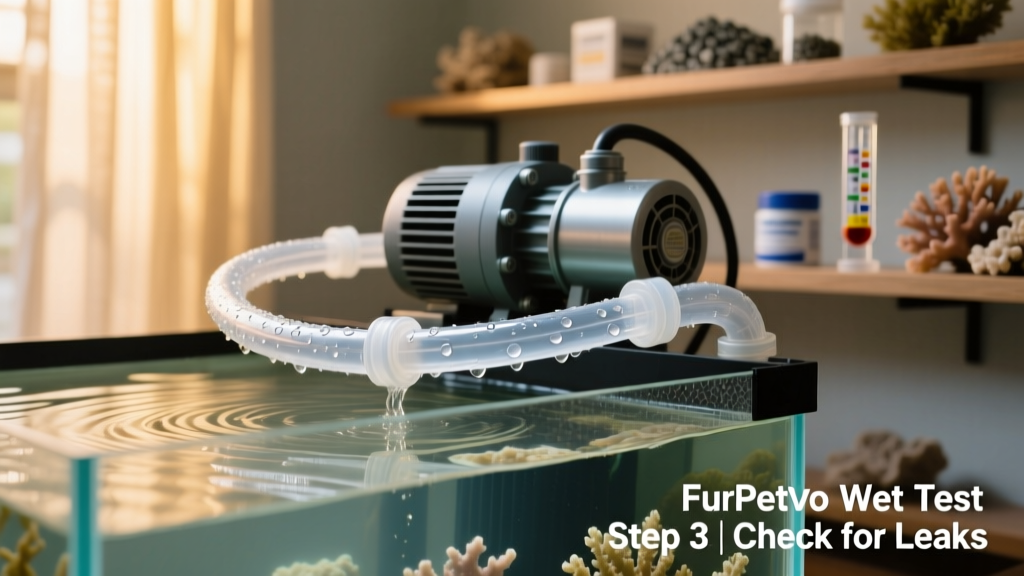
Run a Wet Test of the System
Before adding salt, substrate, live rock, or any livestock, conduct a thorough wet test using fresh water. This critical step verifies that every connection is secure, every pump functions properly, and no leaks exist—saving you time, money, and potential disaster later.
To perform the test:
- Tighten all hose clamps and plumbing fittings.
- Fill both the aquarium and sump (if applicable) with fresh water.
- Wipe down the exterior surfaces and surrounding area completely dry.
- Plug each pump into the power strip—one at a time—and monitor for vibration, noise, and proper flow.
- Inspect every joint, fitting, and hose connection for signs of leakage.
- Test your protein skimmer: although no waste is present, confirm it produces steady bubbles and runs smoothly on its designated pump.
- Simulate a power outage by cutting power at the strip or timer. Watch closely—if using a sump, ensure it doesn’t overflow as water siphons back from the tank. If overflow occurs, restart the pump, remove some water from the sump, and retest.
For added safety against siphoning during outages, consider drilling a small 1/16-inch air-bleed hole in the return pipe just above the water line in the main tank. This breaks the siphon automatically whenever the return pump stops.
Add Substrate and Sea Salts
Once your wet test passes with flying colors, you’re ready to begin building your marine environment. Start by adding your chosen substrate—live sand, aragonite sand, or crushed coral—following manufacturer guidelines for depth and rinsing (if required). Gently pour or scoop it in to avoid disturbing future aquascaping.
Next, prepare your saltwater:
- Use high-quality marine salt mix formulated for reef or fish-only systems, mixed with RO/DI water at the recommended ratio (typically 1.024–1.026 specific gravity).
- Mix salt in a separate container using a submersible pump or powerhead—never add salt directly to the tank with substrate or rock already in place.
- Allow the mixture to circulate for several hours, then test salinity, pH, alkalinity, and temperature before transferring it into the aquarium.
Slowly fill the tank with prepared saltwater, directing flow onto a plate or bowl to prevent disturbing the substrate. Let the system run for 24–48 hours to stabilize temperature and circulation before moving on to live rock and cycling.