How To Give Your Dog CPR: A Step-by-Step Guide
When you and your beloved dog face a pet emergency, your first priority is keeping them safe. Learning how to perform CPR (cardiopulmonary resuscitation) can literally save your dog’s life in critical situations—so understanding the steps is essential.
Whether you’re preparing “just in case” or responding to an urgent situation right now, this veterinarian-reviewed guide offers clear, actionable instructions. Consider bookmarking this page for quick access during emergencies.
When Does Your Dog Need CPR?
CPR is a lifesaving emergency procedure used when breathing has stopped or there’s no detectable heartbeat—both life-threatening conditions. Its purpose is to manually circulate blood and deliver oxygen to vital organs until professional veterinary care is available.
Your dog may need CPR if they:
- Are unresponsive (do not react to voice or touch)
- Are not breathing
- Have no detectable heartbeat
Situations that may lead to cardiac or respiratory arrest include:
- Cardiac arrest
- Drowning
- Electric shock
- Severe body trauma
Step 1: Assess Your Dog’s Condition
Quick, accurate assessment is critical before starting CPR. Ask yourself these three questions:
Is my dog responsive?
Call their name firmly and gently shake their shoulder. If they open their eyes, move, or vocalize, CPR is not needed.
Is my dog breathing?
Look, listen, and feel:
- Observe the rise and fall of their chest
- Listen closely for breath sounds near their nose and mouth
- Hold your cheek near their nostrils to feel for airflow
If your dog is breathing—even shallowly—they do not require CPR.
Is my dog’s airway clear?
Gently open their mouth and check for obstructions like food, chew toy fragments, or vomit. If visible, carefully remove it with your fingers or tweezers—avoid pushing anything deeper into the throat.
Important safety notes:
- If your dog resists mouth opening or becomes aggressive, stop immediately. They likely don’t need CPR—and you risk injury. Head straight to a vet.
- If your dog is actively choking (coughing, gagging, pawing at mouth), they may need the canine Heimlich maneuver—not CPR.
- If your dog is unresponsive, not breathing, and allows safe mouth access, begin CPR right away.
If someone can drive you to the nearest emergency veterinary clinic, start CPR while en route. If you’re alone and no help is coming, do not attempt CPR—transport your dog to the closest emergency vet immediately.
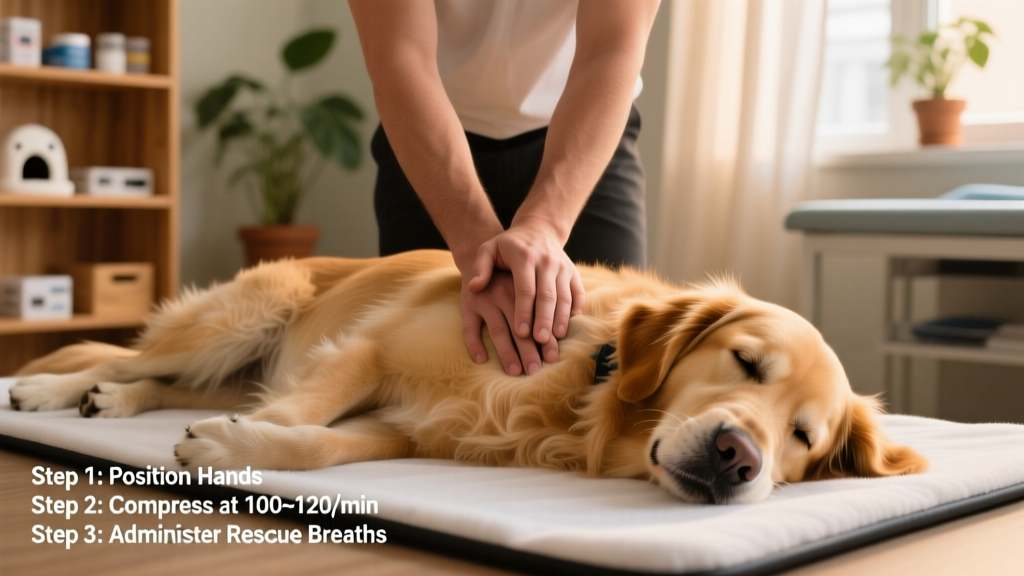
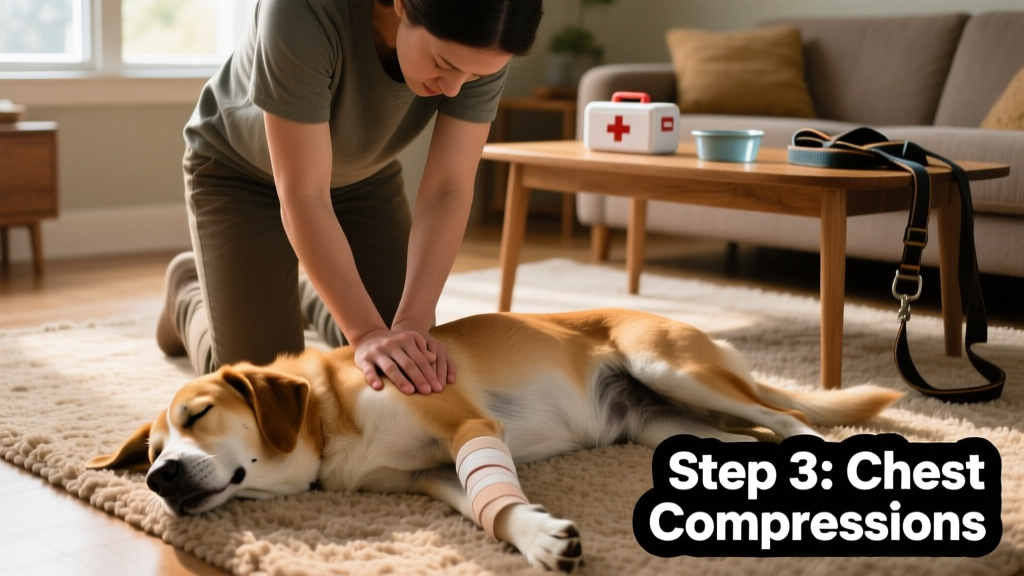
Step 2: Get Into Position
Position your dog on their right side on a firm, flat surface. Kneel beside them with their spine facing you.
Place your hands on their chest—one over the other, fingers interlaced—with your shoulders directly above and elbows locked. Hand placement depends on your dog’s size and conformation:
| Dog Type | Hand Placement |
|---|---|
| Very small dogs (under 5 lbs) | Use one-hand method (see Step 3) |
| Small dogs (5–20 lbs) | Directly over the heart |
| Medium dogs (21–50 lbs) | Over the widest part of the chest |
| Large & giant dogs (51+ lbs) | Over the widest part of the chest |
| Keel-shaped dogs (e.g., Greyhounds) | Over the heart |
| Flat-chested dogs (e.g., Bulldogs) | Over the sternum (breastbone), with dog lying on their back |
To locate the heart: gently pull your dog’s front leg forward until the elbow points toward the chest wall—then place your hand just beneath that point.
Step 3: Administer Chest Compressions
Press down firmly and smoothly, compressing the chest to one-third to one-half its width. Allow full recoil between compressions—don’t lean on the chest.
Deliver compressions at a rate of 100–120 per minute. A helpful mental cue: match the beat of the song “Stayin’ Alive” by the Bee Gees.
Perform 30 compressions in a row.
For very small dogs (under 5 lbs): Use the one-hand method. Wrap your hand around the chest so your thumb rests over the heart (pointing toward the spine) and your fingers cradle the underside. Squeeze thumb and fingers together—keeping your thumb straight and parallel to your palm—to deliver gentle compressions.
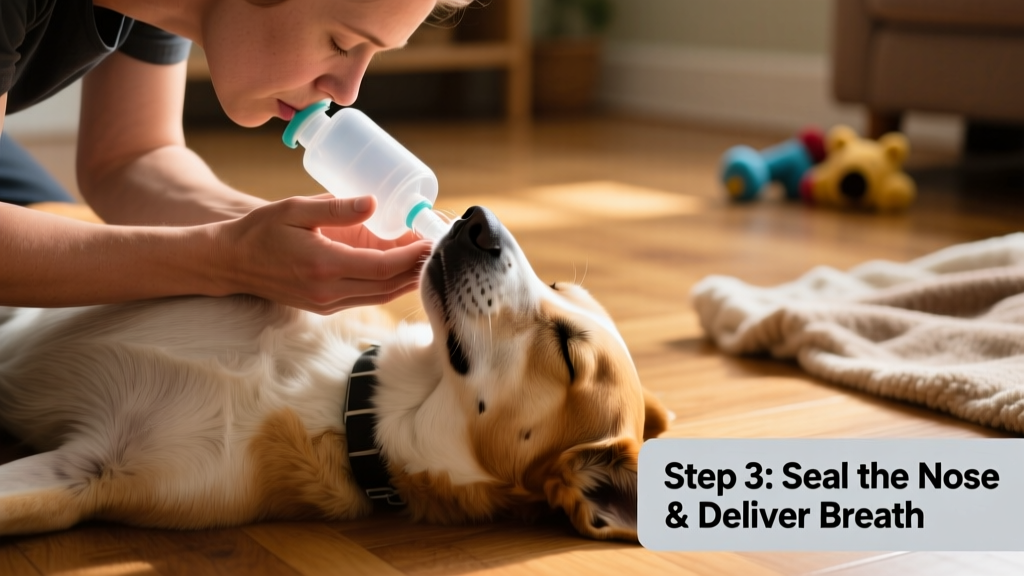
Step 4: Begin Rescue Breathing
After 30 compressions, pause for about 5 seconds.
Extend your dog’s neck gently and keep their head level. Cup your hands around their muzzle to create an airtight seal. Place your mouth over both nostrils and deliver two slow, steady breaths—each lasting 1–2 seconds. Watch for the chest to rise with each breath. If it doesn’t, reposition the head and try again.
Step 5: Continue CPR as Needed
Repeat the cycle:
- 30 chest compressions
- 5-second pause
- 2 rescue breaths
Continue this pattern until your dog shows signs of recovery—such as blinking, coughing, swallowing, breathing independently, or responding to your voice or touch.
Frequently Asked Questions
What is the success rate of CPR in dogs?
The long-term success rate—known as return of spontaneous circulation (ROSC)—is estimated at 6–19%, according to the RECOVER Initiative. Outcomes depend heavily on correct technique, your dog’s overall health, and the underlying cause of the arrest.
Can you use a human AED on a dog?
While technically possible, human AEDs are rarely used in veterinary settings. A dog’s fur must be shaved for electrode contact, and AEDs only work for specific “shockable” heart rhythms—not all arrests. Because of these limitations and limited accessibility, learning proper dog CPR remains the most practical and widely recommended life-saving skill for pet parents.
For hands-on training, ask your veterinarian about local CPR workshops—or explore resources from the RECOVER Initiative. You can also support your dog’s long-term health with routine vet visits, daily wellness monitoring, and keeping a well-stocked pet first aid kit on hand.
Expert input provided by Dr. Jessica Jensen, DVM, a Las Vegas–based veterinarian with the national mobile pet care service The Vets; and Dr. Karen Halligan, DVM, a veterinarian and animal welfare advocate based in Marina Del Rey, California. This article was reviewed by FurPetVo veterinarians.